Saturday, November 23, 2013

Finders Keepers

Sorry it has been a while since I have posted, I just don't know where the time goes! This past week, I had a chance to go out and do some shopping and I found some interesting things for Raleigh.

As you know, I have been looking for a black entertainment center, instead of the silver one that is in Raleigh's living room right now. My Dollar Tree didn't have them, but one in another town did, YAY! The new one matches the end tables, so we are both happy about that.

I think all of you know by now that I am a bargain hunter. Next to Dollar Tree, some of my favorite places to shop are second hand stores, like Goodwill. I scored this fun and funky, purple slipper tub for Raleigh for only 99 cents!

Now I am going to have to create a bathroom to go with this great find. I wonder if I can find a purple toilet somewhere. LOL!

My next great find, at the same Goodwill store, is a Littlest Pet Shoppe Blythe! She was alone, without her pet and her shoes are also missing, but, she was only 49 cents!!!! I took her home and washed her up and her hair became delightfully curly. Isn't she adorable?
My other little girls said they would share their shoes and their pets with her, so she is a happy girl. If anyone knows what set she is from, I'd love to hear from you.

And the finds don't stop there! In Joanns, I found coffee and donuts for Raleigh to enjoy. Coffee and donuts in the fabric store you ask. Yes, in the bead aisle, of all places. I was checking out the clearance section, of course, when I came across this strand of glass beads.
See the little white coffee cups and the pink frosted donuts? I knew that they were the perfect size for Raleigh when I saw them. And you can see, she thinks so too. She is enjoying coffee and donuts while she watches the morning news.


Doesn't she look comfy and cozy in her flannel nightie and soft slippers? Your Blythe doll can have her own slippers too. I have them available in many different colors at: Colleen's Cottage Shop.

I made two more great discoveries while I was looking at Christmas ornaments and both will make great additions to Raleigh's living room. The first came from Hobby Lobby, it is this great ornament that will be transformed into a perfect chandelier.
The only thing that really needs to be done is change out the center crystal. It is far too long and will hang too low from the ceiling. Once I get a new crystal to replace it, it will be perfect.

The other ornaments that I bought was also from Joanns. Isn't this chair just too much! I fell in love with it.
All that I have to do is cut the silver hanging cord and it is perfect just the way it is. The color and fabric will be great in Raleigh's black and white living room.


Oh, I almost forgot about another find from Goodwill. Actually, Raleigh is mortified and didn't want me to show this to you.
She and I both agree that this is a very ugly chair, but for 99 cents, I couldn't pass is up. It has good bones, and I can reupholster it. I promised Raleigh that she could help me pick out the fabric from my stash when I had time to redo it, so we will save that for another post.

So next time you are out shopping, look beyond the normal scope of things for your girls. You never know when something you find will be a keeper.

P.S.: Christmas is coming! Make sure you have stockings for Santa to fill for you girls.
These are also available at: Colleen's Cottage Shop


Monday, October 28, 2013

Such a Snooze... ZZZZZZZ


Raleigh has informed me that her living room is so boring that she fell asleep on the couch.
Well, I have had some projects in mind for the room, so I figured I had better get started with them quickly. You know how those fashionistas can be if they don't get what they want and get it quickly.

The big bottom shelf of her entertainment center was still empty, so I figured that would be a good place to start. I had two pieces of plastic from some packaging that I thought would make a great aquarium. They fit perfectly into that empty shelf. I needed some fish and greenery, so I made some out of Sculpey. (No laughing)
Next, I would need a background and started searching the web for one. Well, it was then that I came across this: Hitty's Print Minis and there was a lovely, printable fish tank. It was going to look much nicer than what I could manage to make. I adjusted the print size so that it would fit on the shelf and printed it on glossy photo paper. I also found a picture of a can of fish food, shrunk it down and printed it on regular paper. I taped it around a piece of drinking straw and added a small button to the top for a lid. Here's what the entertainment center now looks like:
There's a Barbie boom box on the shelf next to the fish food. Barbie and Blythe are both considered to be 1/6th scale which is also called Playscale. I wish that the entertainment center was black like the two end tables. I did go back to the Dollar Tree looking for it in black, but they only have these desk items out during "Back to School" time. I did try to paint it with black acrylic paint, but it didn't stick well to the metal. I would consider spray paint, but I am afraid it would clog up the holes in the mesh. Maybe I will just wait until next year and see if I can get a black one.

Now I had gone through the trouble to make the fish and the greenery, so I didn't want them to go waste. I at least figured out what to do with the leaves. I added a little bit of green paint, in a darker shade, to tone them down a bit. Once they were dry, I coated them with clear nail polish to seal the paint and also make them glossy like real leaves. I rummaged through my "trash to treasure" drawer and found a cover to a glue stick that with a little ribbon added to it would make a perfect plant pot.
The ribbon wasn't quite wide enough, so I glued thin black ribbon around the top edge of the cover. I then filled it with scraps of Styrofoam and stuck the painted leaves in. I spread a thin layer of glue over the foam and then added coffee grounds over it to simulate dirt. I was very happy with the results and so was Raleigh. She was grateful it wasn't a real plant; she simply didn't have time for one with her busy schedule.


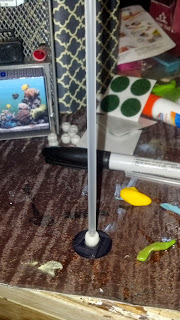
I did once last project to spruce up Raleigh's living room, I made her a floor lamp. It was another trash to treasure project. This is some of what I used:
I also used a button for the base and some pony beads.
I covered the spool with a piece of the plastic, black mesh and then painted it with black nail polish. The lamp post is made with a section of drinking straw that I slid pony beads onto. I had glued the first bead to a button to form the based and the last bead to the spool. Here's the finished lamp:
Raleigh is very happy with what I have done so far, but says it will need more eventually. Fashionisitas! There is just no pleasing them. Now she is complaining that she should have taken off her heels before she fell asleep and put on her new slippers.

Does your Fashionista need some new slippers to pamper her feet? You can find them in various colors at:
Colleen's Cottage Shop

Until next time, Raleigh would like to wish you a Happy Halloween!

PS: Her reversible dress is available at : Colleen's Cottage Shop too.


Wednesday, September 25, 2013

Off With Her Head! And This Time I Really Mean It!

If you are familiar with Blythe dolls, you know that by pulling the string on the back of her head, her eyes will change color. There are four sets of eye chips, in different colors, set at different angles, that make this possible. Even with all this fun eye movement, the one thing that her eyes don't do is stay closed. The eye lids do close in between each eye color change, but that's it. A lot of dolls have eyes that close when they are laid down. Blythe doesn't do that.

If you do a Google search, you will find many tutorials on how to give Blythe sleep eyes. The problem is that you have to open up her head to do this. Frankly, that notion scared me. It had made me nervous enough when I scalped her, never mind opening up her head.

Finally I found a tutorial that didn't require Raleigh to undergo brain surgery. LOL You can find it here:
Sleep Eye Tutorial. I found this a few weeks ago, but was still hesitant about doing it. After all, Raleigh is an Ashton Drake Gallery doll and they are no longer made. Her value (price tag) has gone up substantially since I bought her. And besides, I could never really replace her if she got ruined. Sure I could get another doll, but she wouldn't be Raleigh.

So the tutorial said to use a crochet hook. I didn't have one, so I substituted this hook tool.
Next, I was to pull on the little wire, that is part of a spring, in the slot, on the back of her head, until I saw an eyelet or loop. I proceeded carefully, but instead of seeing a loop, I watched the tiny wire slide through the slot into her head. I freaked out! I tested her eyes and they still worked normally. YAY! I knew I had to fix the spring and they only way to do that was to open her head. YIKES! That is what I was trying to avoid in the first place.

So, I found a tutorial about how to make the sleep eyes with her head open. Tutorial for Sleep Eyes. I got a screwdriver and took out the two screws in the back of Raleigh's head. Unlike some other brands, the Ashton Drake Blythe dolls have 2 screws and not 3. First thing that happened when the screws came out was that her head fell off her body. Now I am in complete panic! They don't warn you about that.
The picture is blurry because my hands were shaking. I was hoping that I didn't do any damage to the neck. Nothing I could do but to keep going and fix the spring.

The front and back plates had to be separated to fully open her head. There is a seam, so this isn't too hard. Since I had scalped Raleigh, it wasn't difficult to do. I am not sure how manageable it would be if her scalp was intact, but in the tutorial, they didn't remove it.
So now you can see the spring above her eye mechanism. There is no eyelet or loop at the end of it, which is why the wire went inside her head. Ashton Drake dolls differ from other in this case too. The end of the spring is just a small piece of wire, which has a slight bend in it, to hook over the slot in the back of the head. The only way to do the sleep eye technique, on an Ashton Drake doll, in my opinion, is to open her head.

The next step is to feed a cord through the hole where the spring is attached. I used a cord which is meant for making jewelry. Then, to keep the spring from moving around too much, you tie the cord to the other end of the spring. This was tricky without a loop to tie it through.
You can actually remove the spring entirely, but if you want to put her eyes back to normal, you will need it. I wasn't going to fiddle with it and so I just left it tied off.

After feeding the new cord into the slot. It was time to put Raleigh's head and body back together and test things. Thankfully, her neck was fine and everything went back into place perfectly. I tested her new skill and Voila! it worked!
I had to put a pull ring on the new cord, but I decided to use a charm instead. Since I was doing that, I figure I would also put one on her original cord and take off the very plain pull ring. I also shortened the cord at that time. I always felt it was way too long and it was always getting in the wasy.

This funky glass star and heart were in my bead stash and thought they were perfect for Raleigh. Now, when you pull the heart cord, Raleigh's eyes close. Note: if you do this, make sure you pull hard enough to hear the "click" from the eye mechanism, at least in Ashton Drake models. When you pull the star cord, her eyes open and have changed to the next color chip.

I am very happy with the results of this, it was just a bit nerve wracking along the way.

I will close by sharing a new dress I made for Blythe this week. It is reversible, so you get 2 looks for the price of 1. You can purchase it here: Reversible Dress for Blythe


I have more of these versatile dresses cut out and ready to sew. You can look for them in the near future.


Thursday, September 19, 2013

No Skeletons In This Closet

Raleigh has been accumulating a lot of things lately. Her latest are from Canada, but I will tell you more about that later. Right now, I had all of her clothes, jewelry and other things in plastic shoes boxes. It kept the dust and pet fur off, but it was hard to find things. I had to come up with a better storage idea.

If you read my other blog: Colleen's Cottage Crafts, this wine box will look familiar to you.

I found it in the garage when I moved in with my fiance. I wasn't quite sure what to use it for, but I knew it would come in handy at some point. Suddenly it came to me. This box was going to be the solution for Raleigh's storage problems and the closet project got under way.

Since Raleigh and my other dolls keep me company in my sewing/craft room, I wanted it to coordinate with the decor in there. I went shopping and found 2 different shades of aqua acrylic paint that would work perfectly. I decided to paint the outside of the box the darker of the two shades and do the lighter one inside.

I was going to do two coats of paint, but I decided I like the time worn look of the wood after just one coat.
As you know, I don't have much in the way of funds for doll things right now, so if I have something on hand I can make work, I am delighted. I didn't have a thin enough dowel for closet rods, but I had these heart things and I thought they might work if I took them apart.
The heart came off the top, after a bit of persuasion, but unfortunately, the dowel was to short to span the sides of the box. Once again I had to get creative. I cut squares of foam core and stacked them on each end of the dowel until it fit the box perfectly. I painted them the same color as the inside of the box.
I glued the dowel into the stacks of foam core and glued them into the box. I didn't like the way the edges of the foam core looked, so I found some ribbon that was a good color and glued it around the stack of squares.


I made some tiny hangers using jewelry wire and started to hang some clothes.


Her dresses and longer things will go on the top, while tops and skirts will go on the bottom. I put some of her shoes on the bottom, even though she has a big shoe organizer. They just looked cute there. Raleigh got a new skate board (Dollar Tree, scored a package of 2 boards and extra wheels) this week, so maybe I will store that there instead of her shoes.

I needed a place to store Raleigh's jewelry, hair accessories and glasses. On the door portion of the box, I attached a ribbon at the top and bottom with push pins. Glasses and hair accessories go on the top ribbon and earrings hang at the bottom. I also put some push pins on the slats to hold necklaces.


I really think this was a great way to use the wine box. 

My LPS Blythe dolls are jealous and want a closet too. I think I have something around here that just might work for their tiny things. I can even make hangers tiny enough. LOL!


Now, as for the new goodies from Canada. I belong to a group called Blythe Kingdom. They have swaps there that you can sign up for. Last month I participated in the Beach Babe Swap and my partner was from Canada.  You can see some of the things she sent by looking at my Flickr Album. I loved everything she sent, but I will share a sneak peek by showing you my favorite. Donna T., my partner, hand knit this mermaid outfit for my LPS doll.
Isn't it amazing! The stitches are so small and delicate. She did a wonderful job. I have left it on my doll and don't think she will ever have it off. I can't wait to sign up for another swap, if was so much fun!


Monday, August 26, 2013

Pink is Best for Pigs!

I bought a Barbie vanity at a flea market at a great bargain price. Of course it was bright Barbie Pink and had glitter stickers on it. It was not Raleigh's style or mine, so something had to be done about it.


There are some great tutorials on the web for redoing plastic furniture. This one tells you how to make faux woodgrain:  http://www.dolls-n-daggers.com/Dolls/Forum/index.php?topic=297.0.

I decided to just paint it white. Normally, I would use spray paint. I didn't have any and as usual my budget is tight, so I just hand painted with acrylic paint. The key is to use several thin layers of paint to get good coverage.

The other problem with the vanity was that the only part of the stool that was included was the top.
I cut a section from a toilet paper roll to make a base.
Then I covered the entire piece with fabric and lace to match Raleigh's bedroom diorama. Here is the repainted vanity with the new stool.
I think it gives it a cottage look, which is much more to Raleigh's liking and mine.

While we didn't want the vanity to be pink, there are some things that color is perfectly suited for - PIGGIES! I adore pigs and one day I hope to have a teacup pig as a pet. In the meantime, there was no reason that Raleigh couldn't have one. I searched the internet for a pattern and found one here:
http://dollmaker.nunodoll.com/pig/pig.html. The pattern I used is on the second page. Raleigh is very happy to have a new friend.
Her piggy doesn't have a name yet. Could you help her come up with one?


Saturday, August 10, 2013

Little Did I Know

Little did I know that I have had 3 Blythe dolls and not just one. How could it be possible not to know this? Well, a couple of years ago, a friend gave me 2 dolls for Christmas. They were in sets called "Blythe Loves Littlest Pet Shop".  I love them, they are tiny little dolls withe BIG eyes and they have little pets. I have them displayed in my craft/sewing room so I see and enjoy them every day. I saw the big eyes and saw the relationship to my Blythe doll and to me that was it. That was until a week or so ago. I joined a group called Blythe Kingdom. It was on that site that I discovered that the Littlest Pet Shop Blythe dolls, also referred to as LPS, were made as replicas of the original Blythe dolls. They are approximately the same size as the Petite Blythes and are collected, customized and loved my Blythe collectors. I have Playfully Plaid

and Buckles and Bows. She is wearing the new dress I made. It is available on my web site Blythe - The Big Eyed Girl
I think there will be more of these little cuties added to my collection in the future.

Raleigh had some more items added to her living room diorama, from the office supply section of Dollar Tree, as usual. This is meant to hold paperclips and such.
I thought it made a great end table, so I bought two.
Here's a close-up with a new table lamp I made from Peruvian beads.
There are other items made with these wonderfully, hand painted beads on my site, on the Accessories page. Here is a picture of one the vases made with these beautiful beads:


Raleigh also got a great vintage piece this week - a manual typewriter. She thought it would be fun to doing some writing old school style.

I have also been working on Raleigh's bedroom this week, but we will save that story for next time.