Thursday, July 25, 2013

Two Debuts!

Exciting and fun week in Raleigh's world this week. I have been very busy creating a new room and a new fashion statement!

Being a seamstress, I thought it was only appropriate that Raleigh had a sewing room too. While I was out shopping, I found the perfect start for the room. I bought this package of sewing themed erasers at Michael's.
I knew the size of the sewing machine would work, but the appearance needed some adjustments. I painted it white with LOTS of coats of white latex paint. I wrote the word SINGER with red pencil on white paper and decoupaged it to the machine. I coated the whole thing with clear nail polish. I glued a mini black button on the front and dabbed on some latex paint to cover the holes.


It's a chair!
It's a chair!
Actually, it is a cell phone holder
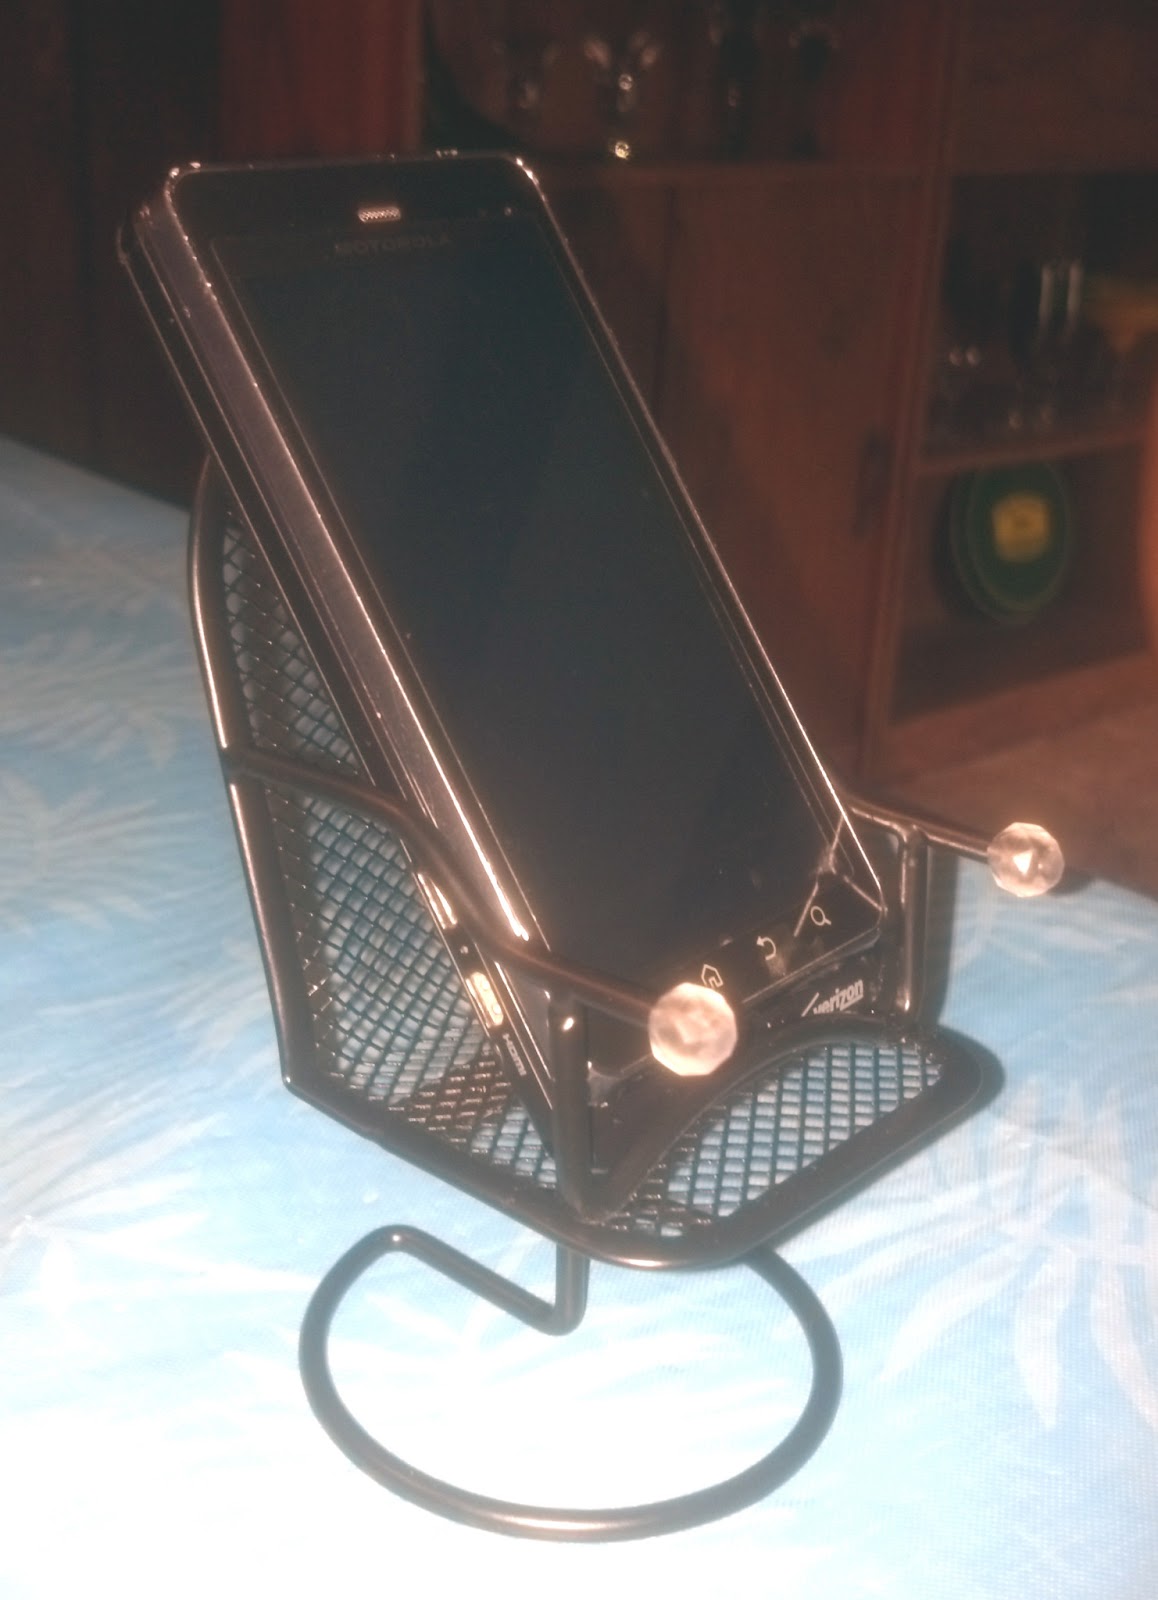
But it makes a perfect chair for Raleigh and was the perfect addition to the sewing room.

For a desk, I bought a pre-primed wood plaque and some wooden spools and glued the together and painted it black.
I used the spools and some craft sticks to create a shelf, which I also painted black. 
I used a tag die and my Sizzix and cut some corrugated cardboard to create bolts to wrap fabric on for the shelf.


The card of buttons was also made using my Sizzix and some mini buttons.


Excuse the blobs, the glue wasn't dry when I took the picture.

Another project using my Sizzix was the wall shelf. I use the same die that I did for the bolts, except a longer tag and cut some cardboard. The brackets were made with a photo corner die. That die is too thin to cut cardboard, so I cut card stock and glued layers together until I got the desired thickness. I covered the edge with mini ball fringe to cover the cardboard. 


 I repainted the mini dressform eraser to use as a decorating accent in the room. For other decor, I used some decorative buttons. I cut the shanks off and used mounting tape to hang them on the walls. 

I also used a clock face button and glued it to a larger button for a wall clock.


The last project using my Sizzix was the dress form in the corner.  I used corrugated cardboard again and glued it to a button. I added gathered tulle and a string of beads. I will probably add some color contrast to it in the future.


The room is a binder, just like the living room diorama. It is scrapbook paper on the upper wall. Since I only had 1 piece of the button papers, I cut it in half and used coordinating card stock for the bottom of the wall. I used ribbon for the border between. The floor is also scrapbook paper, decoupaged to foam core.


I am happy with the  way the project turned out. I am going to keep it on display in my sewing room, whereas the other dioramas I make will be used as needed. I would like to make some more little accessories pieces for the room in the future.


As if this wasn't enough for this week, I have more! A fashion debut as well. Raleigh has wings! I have created wings that can be worn by your doll.
The wings can be pinned on your doll's outfit, so they are very versatile. They are available on my web site in various colors and styles:  Blythe - The Big Eyed Girl. Come check them out and let your Blythe soar!


Wednesday, July 17, 2013

Confessions of a Pinterest Addict

Hi, My name is Colleen and I am addicted to Pinterest. Glad to have that off my chest. LOL. As if I didn't have enough things I want to make, I discovered Pinterest and found thousands more. There are ideas for all sorts of crafts, decorating, food travel, etc. You name it, it is on Pinterest.

Of course I was very happy to find lots of beautiful pictures of Blythe dolls, great outfits, customization, accessories and more. Certainly sparked my imagination and gave me great ideas to work with. I will share a few of the projects that I have made from Pinterest inspirations.

Oh, before I forget, I have decided to rename my doll. My friend Sharon, of Little Rose Creations, is in the process of building a Blythe doll, that she is naming Ophelia. I loved the idea of the doll being called something other than Blythe, since there are 1000's of them. After some thought, I decided to name her Raleigh. This is the original Gaelic spelling of my maiden name, Riley. She is an Ashton Drake Pinafore Purple, so she is a natural redhead. I thought a Gaelic name was very appropriate for her. Have you named your doll? Would love to hear what you have called her.

Ok, so now on to the projects. I mentioned before that I wanted some sort of diorama to photograph Raleigh indoors. Pinterest to the rescue! I found an easy, inexpensive idea at: Southern Disposition. And here is mine rendition. Please note the inside of the binder is completely covered in scrapbook paper. The white is glare from the flash.

Look how great Raleigh looks in her new space
Yes, that's a new couch and ottoman that I made. After looking at beautiful Blythe furniture on Pinterest, my paperback book sofa just didn't cut it. The couch is made from Styrofoam, covered in fabric and has clear push pins for feet. Below are pics through the various stages of construction.
If you have any questions about how I made this, drop me a line. 
 
The ottoman was also inspired by Pinterest, but not anything specific. I used an Altoid tin for the base, covered it with alligator textured felt and a satin ribbon and then added pony beads for feet. Here is the completed piece


For the last Pinterest inspired project for this week, I made Raleigh a new suitcase for summer vacation. Here's a link to the inspiration: Life in the Craft Lane and here is Raleigh all set for her trip
If you would like to purchase a suitcase like this, it is available on my web site: Blythe: The Big Eyed Girl.

Here is a link to my boards on Pinterest, Colleen's Pinterest Boards, I hope you find some inspiration there too!

Wednesday, July 10, 2013

SHOES!!!

This week's blog posting will be short and sweet because I have several exciting projects in the works that aren't quite ready to share.

I did find a great way to organize all of Blythe's shoes. Before I show you that, did you know that Blythe can wear a variety of shoes belonging to other dolls? She of course has shoes that are made for her, but she can also wear some Barbie shoes, as well as shoes made for Tiny Betsy McCall.

I am limited in what I can wear for shoes because of several previous surgeries, so to quell my love of shoes, I live vicariously through my dolls and Blythe is no exception. I was tired of rummaging through a box trying to find a matching pair. Blythe needed some sort of shoe organization and I found it in the office supply section of my local Dollar Tree. As you see, it is an ordinary, plastic desk organizer.
I turned this up on its end and it made the perfect place to store ALL of Blythe's footwear.


If you look from the side, you can see she can even fit her figure skates in. You may have noticed the wooden shoes on the top. They are actually souvenirs from Holland that fit Blythe perfectly. The blue wooden shoes with the red and white heart design (second row from the bottom) are souvenirs from Finland which also fit her perfectly. You never know where you are going to find goodies for your Blythe, so keep your eyes open.

Don't foget to visit my web site: Blythe - The Big Eyed Girl

Saturday, June 29, 2013

Props, Panties and Pretties!

I had a very creative week. I was able to carve out quite a bit of craft time, so Blythe got lots of new goodies.

I have decided that I am going to make 2 dioramas to photograph Blythe; a bedroom and a living room. Fat quarter were on sale at Joann's for 99 cents, so I picked out some cute fabric to use in the bedroom.
The table that I made with the relish jar and showed you last week is going to go in the bedroom, so it needed a new table cloth. I had some pretty pink fabric in my stash, so that made it easy. The table needed a lamp, so I decided to make one. I save stuff that I think can be made into something, so that's where I started looking for supplies. I had a cardboard core from a roll of tape that would make a perfect shade. I also had some thin cardboard that I traced the outline of the core on and cut out the circle.
I had a large glass bead that would be perfect for the lamp. I glued the cardboard circle to the bottom of the core. I covered the tape core with the fat quarter fabric and then glued fringe around the bottom edge. I glued the "shade" to the bead using the cardboard circle for it to rest on. And here is the finished lamp and table with the new cloth.
The little owl statue is a ceramic bead. He added just the right touch to the table.

Another prop I made utilized an eraser, 2 buttons and a pushpin - weird combination, but great results. Here's the eraser:
Using wire cutters, I snipped of the metal portion off the pushpin and then glued it between 2 different sized buttons.


Several coats of white paint and clear nail polish were then applied. Yes, nail polish. For small items, I use clear nail polish to apply a gloss coat. It gives you a small brush to use and you don't have to by a big can of clear coat. I buy the cheapest polish I can find and it works great. I also use colored nail polish in the same way. I have another project in the works that I used black polish to paint it, hopefully you will see that soon. Anyway, enough of that, here's my finished prop:


Blythe also got her ears pierced this week! There is a great tutorial here, as well as other customization tutorials: My Delicious Blythe. I made lots of new earrings and added them to my web site:  Blythe - The Big Eyed Girl.  Here's just one pair for you to take a sneak peek,

The panties that came with Blythe were not very attractive and I decided that it was time to make her some new ones.  Here are her original undies:
And now, here are her new ones:

Does your doll need some pretty panties? You can get these, as well as some other patterns on my site: Blythe - The Big Eyed Girl

Last little thing I made was a wreath for Independence Day. After all, our girls need to decorate for the holidays too.
Have a safe and Happy 4th of July!

Saturday, June 22, 2013

Frugal Furnishings

As with most Blythe owners, I love to photograph my doll. I prefer to photograph her outdoors. Since I live in Indiana where we have snow, rain, heat and high humidity, that's not always possible.

I want to build some sort of diorama or something to take pictures indoors. I have seen some ideas on-line, but haven't quite decided on what I will do yet. In the meantime, I thought it might be fun to make/find some props to use.

The first thing I made was a couch. I took 2 old paperback books and covered them in faux leather. I glued them together at a right angle and added round beads for feet. I have an Ashton Drake doll and she does not have an articulated body. Her knees bend only slightly, so I wanted a couch that would accommodate that 
issue.
This couch cost me nothing to make because I had all the supplies on had.


The next project was a "trash to treasure" project. I used an empty relish jar for a table. I made a table cloth for it by measuring from the bottom on 1 side, up over the lid and down the other side to the bottom. Once I had this measurement, I knew that I would need a circle, with that diameter, to use as a pattern. One of my saucers was exactly right. I traced around the saucer onto my fabric. I used my serger and made a rolled hem around the outside of the circle. After that. I dampened the fabric and put it over the relish jar. I folded the fabric a bit so it draped nicely and then put an elastic band around it. I let it dry overnight and then removed the elastic. The drapes stayed perfectly.


The silver horse statue is a charm glued to a button. I cut the loop off with wire cutters before gluing it. It was not a sterling silver charm, just some pot metal. The statue and the table project were also cost free as I utilized things I had.

The last project did cause me to dip into my wallet. I was at my local Dollar Tree (one of my favorite places to shop) and found a magnet that looked like a TV. It was meant to put a photo in. Instead, I covered the screen with a piece of silver paper.
The next thing I found was this little desk organizer. It looked like a mini entertainment center to me.
 I stood it on end and added the TV to the top. I plan on filling it in with other things as I go. I may also paint the "entertainment center" black.
This project has cost $2.00 so far, but I know it will be worth it once I fill it in.

Blythe is in the same scale as Barbie, therefore you can use her furniture and accessories too.  Here is a great tutorial on how to make the plastic furniture look like wood: http://www.dolls-n-daggers.com/Dolls/Forum/index.php?topic=297.0 

If you have made any items for your Blythe doll, please feel free to share. 

In addition to these projects, I made some new clothes for Blythe that is available for sale on my web site.